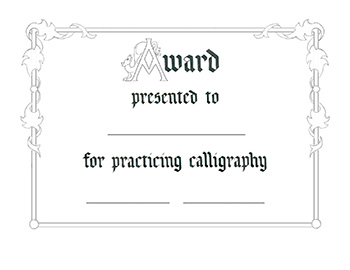
We’ve been spending time practicing our lettering, so let’s take a break and make ourselves an Award for all our hard work!

Simple Award
In this demonstration, we’ll go through the steps of design, layout, lettering and painting a simple Award certificate combining elements from the following posts:
- Gothic lettering: Demystifying Gothic Lettering
- Painted initial: Painting a Simple Initial
- Acanthus Leaves: Calligraphy Design: Acanthus Leaves
- Centered lettering: Calligraphy: Centering Lettering in a Certificate
The steps and processes in this demonstration reflect the stages I generally follow when creating a work that combines calligraphy and painting. Depending on the complexity of the work, some steps can be combined, skipped or sometimes expanded if required.
This demonstration is just one method – as you gain experience with your projects, you’ll develop your own methods of what works best for you!
What you need:
Paper:
- 8 1/2″ x 11″ paper suitable for water media. A 90 lb. hot press watercolor paper works well.
Lettering:
- calligraphy pen and 2 nibs – one broad (about 3mm) and one medium (about 2mm). The demonstration uses 3mm and 2mm Brause nibs.
- graph paper or guidelines for each nib size (see Calligraphy Resources page or Stroking the Rules post.)
- ink
Layout and Design
- graph paper (see the Calligraphy Resources page)
- pencil, eraser
- ruler
- 3M Scotch Removable “Magic” Tape
- scrap paper
Optional:
- tracing paper
Painting
- round brushes (one medium and one small)
- mixing palette
- gouache – blue, red, yellow and brown (Ultramarine Blue, Cadmium Red, Yellow Ochre, Raw Umber)
- drafting tape or tape suitable for watercolor painting – test on a piece of your paper before using it to make sure it won’t damage the paper surface
- clean water
Step 1: Lettering
First, we’ll letter the text on graph paper or guidelines in a Gothic style (refer to the Demystifying Gothic Lettering post.) Write out each line separately using the 3mm nib for the letters “ward” (for “award”), and the 2mm nib for “presented to” and “for practicing calligraphy”.
We’ll be using a painted intial for the “A” in “Award” so we only need to letter the “ward”. You can use either the initial in the Painting a Simple Initial post, use the one I designed for this demonstration with the drollery “dragon”, or draw your own!

Initial "A" with Drollery Dragon
Next, use a ruler to measure the “presented to” and “for practicing calligraphy” lines of lettering, find the center, and mark it with a pencil line.
Note: Lines are shown in red for clarity – use a pencil to lightly mark lines.

Marking Center Lines
Print out or draw the initial “A” on graph paper or tracing paper. Line up the lettered “ward” with the initial “A”, tack it together with removable tape and mark the center. Note that only the letters “A” and “ward” are included when marking the center as shown below.

Marking the Center Line
Step 2: Layout and Design
We’ll use an 8 1/2″ x 11″ sheet of graph paper to work out the rest of the design, and then transfer it to our final copy paper.
First, draw a box with the lines 1″ from the top, 1 1/8″ from each side, and 1 1/2″ from the bottom for the inside border line.

Inside Border Line
Draw a second box 1/8″ all around the first box. This will be the border bars.

Outside Border Line
Step 3: Acanthus Leaves
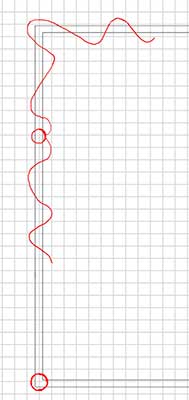
Now we can have some fun! On one side of the border (we only need to do one side because we will transfer it to the other side) draw a circle about 2 3/4″ from the top of the paper over the border lines. Draw another circle at the bottom corner. From the first circle, draw a wavy line up the border and around the top, and a second wavy line down the border for the acanthus main veins (refer to the Calligraphy Design: Acanthus Leaves post.)

Drawing Border Circles and Acanthus Lines
Draw the acanthus leaves, wrapping the leaves in front and behind the border lines.

Drawing Acanthus Leaves
Use the tracing paper to make a copy of the leaves and circles – we’ll use this to transfer the design to the other half of the final copy paper.
Step 4: Guidelines and Lettering
On your final copy paper (e.g. watercolor paper) with a pencil and ruler, lightly draw the border lines as in Step 2. Find the horizontal center, and draw a vertical line down the paper.
We’ll draw our guidelines and complete the lettering first (refer to the Calligraphy: Avoiding Mistakes post for order of execution.)
Starting with the “Award” lettering draft, draw a light pencil line on the final copy paper about 2 1/4″ from the top of the paper. Use removable tape to tack the lettering and initial on the paper so that the baseline of “ward” sits on the pencil line and the center line is lined up with the paper center line. Add a light pencil mark to indicate the beginning and end of the lettering. Remove the draft and draw the rest of the guidelines for “ward”.
Repeat with “presented to” with the baseline at 3 1/4″ from the top, and “for practicing calligraphy” with a baseline 5 1/4″ from the top. Draw the guidelines and complete the lettering.

Centering Lettering with Baselines
Step 5: Name, Signature and Date Lines
If you want to add a line for the name, draw a centered line about 5″ long and 4 1/2″ from the top of the paper.
The signature and date lines are 6 3/8″ from the top of the paper and the length of the “for practicing calligraphy” line with approximately 1/2″ space between the lines.
Step 6: Transferring the Design
Transfer the drawing of the initial “A” on to the paper (refer to Painting a Simple Initial for one transfer method.)
Transfer the acanthus leaves and circles to one side of the border. Flip the tracing paper drawing and transfer it to the other side of the border. If necessary, clean up any pencil lines and erase extraneous lines.

Paper with Transferred Design and Calligraphy
Step 7: Painting the Initial
We can start with painting the initial. Mix up a bit of red gouache and paint the “A” with a medium brush. The drollery dragon is outlined with a small brush using a mix of Raw Umber lightened with a bit of opaque white. You can also add a few line details in the dragon as shown, add a few white dots inside the “A”, or change the “A” into a puzzle initial (refer to Painting a Simple Initial.)

Painted Initial
Step 8: Painting the Border
Next, we’ll paint the border bars using an old painting trick to make sure the lines are straight. Cut pieces of masking tape and run the pieces down the outside and inside of the border lines. Make sure the edges of the tape touching the pencil lines are flat without any folds or spaces to keep the paint from spreading under the tape.
Now you can paint over the lines! Mix up a bit of Raw Umber gouache and paint in all around the border skipping the areas the acanthus leaves and circles cover. Let the gouache dry for while before removing the tape. Sometimes it might seem dry on top but the paper could still be damp.
Remove the tape, and when you are sure the gouache and paper are completely dry, add another mask of drafting tape, this time covering a bit of the painted edge on each side.

Masking the Border for Painting
Mix up opaque white gouache, and paint around the border again. Remove the tape when the gouache and paper are dry.
Step 9: Painting the Acanthus Leaves and Circles
We’re almost done! Paint the acanthus leaves starting with Yellow Ochre (underside of the leaves) and then with Ultramarine Blue. Add line details and highlights (refer to Calligraphy Design: Acanthus Leaves.).
Paint the red circles with the same color as the initial. Add a few lines for highlights and we’re finished!
Wait until all the painted areas are completely dry and then carefully erase any pencil lines.
Now you can add your name (refer to Calligraphy: Centering Lettering in a Certificate), sign and date it!
This is just a simple, basic certificate. You could continue adding details such as wrapping more acanthus leaves around the border, changing the border lines to something more complex, incorporating more drollery figures – be creative!