Scatter borders are beautiful decorative elements utilizing naturalistic flowers, berries, birds, animals and insects in an illusionistic or trompe l’oeil style often painted on gold backgrounds. The finest examples of scatter borders are found in French and Flemish manuscripts dating around the late 15th- to early 16th-Centuries.
These are just a few examples of scatter borders at the British Library Catalogue of Illuminated Manuscripts:
Harley 2443 f. 2
Netherlands: Violets, strawberries and butterflies
Egerton 1147 f. 71
Netherlands: Roses, moths, fly and deer
Egerton 2125 f. 216
Netherlands: Roses, snails, butterflies and peacock on light blue background
Two excellent books on the plants used in borders are:
The Medieval Flower Book, Celia Fisher, The British Library, London 2007
Flowers in Medieval Manuscripts, Celia Fisher, University of Toronto Press, 2004
Although the books focus on the identification of plants and flowers in manuscripts, both contain wonderful detailed reproductions of scatter borders and are recommended as references for further study.
Drawing and Painting Realistic Plants
Now is the time to get a sketchbook if you don’t have one already!
If possible, draw your sketches from live specimens rather than from photographs found in books or on the internet. Aside from copyright issues, photographs tend to flatten and distort images and your plants will look dull and lifeless unless you are familiar with compensating your drawing and painting to correct these distortions.
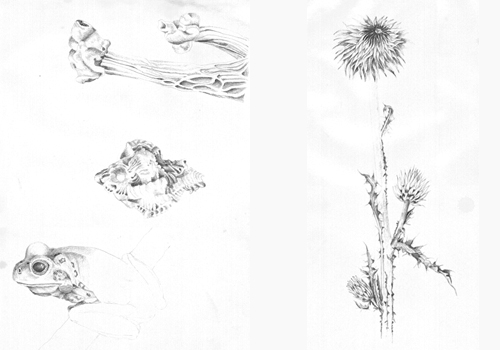
Here are a couple of pages from one of my rather tattered sketchbooks:
Sketching and drawing will also be more beneficial when it comes time to paint as you can be selective with drawing details that might be lost in a photograph alone.
Photographs can be used in conjunction with your sketches. Taking your own photographs of specimens you have sketched will be handy references of what you have seen and will greatly assist in the realism of your work when you begin painting.
One of the key features of scatter borders is the illusion of elements scattered around the page, but painting complex elements in a realistic style will take a little skill and painting experience – there is no fast or easy method to substitute for patience and practice.
An excellent book on how to draw and paint plants for illustration is:
How to Draw Plants The techniques of botanical illustration, Keith West, Timber Place Incorporated, 2005.
Finding Elements for a Scatter Border
Scatter borders can be simple or complex depending on your design requirements. Any type of plant, flower, berry, insect, etc. can be incorporated into the design, but consider using foliage indigenous to your location to give your borders a unique “local” flair.
Wonderful flower and insect specimens can probably be found in your own backyard or garden – you don’t have to pick them – take a few quick sketches and make notes about the color and other details.
Don’t have a garden? Try sketching and photographing flowers in a local park (make sure you don’t pick any plants or flowers), or perhaps a greenhouse will give you permission to make sketches and take pictures (remember to ask for permission!)
Purchase an interesting flower or two from a florist. Make your sketches while it’s still fresh, and take a few photographs from different angles. Observe how the plant grows, what the leaves look like, colors, etc.
Any type of plant can used – don’t have any access to flowers? I’ll bet you’ll be able to find weeds growing somewhere! Even a humble dandelion or thistle will make an interesting and colorful border.
Or how about a trip to the grocery store to purchase seasonal fruits, berries and fresh herbs? You can always eat your grocery store purchases after making your sketches and photographs!
Keep your eyes open and a sketchbook and camera ready and you’ll soon be able to build up a library of elements to use in your scatter borders!
Designing and Painting a Simple Scatter Border
We’ll start with one of the simplest forms – berries. Berries are generally round, circular shapes and easy to find on common shrubs or grocery stores. Any type of round berry will be fine especially they have a little stem attached.
In this demonstration, we’ll use simple berries with stems to scatter around a border with a gold background.
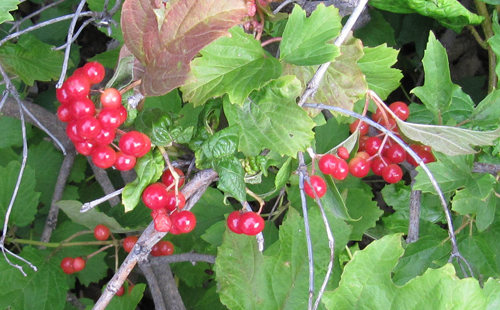
The red berries I’m using are from a common High Bush Cranberry (Viburnum trilobum) shrub as the berries are easy to find – even during the winter.
Here is my reference photo:
Layout
What you need:
- graph paper
- pencil
- eraser
- ruler
Painting
What you need:
- round brushes (medium and small)
- flat brush (1″ or 2″)
- mixing palette
- gouache paint (Opaque White, Ultramarine Blue, Cadmium Red, Yellow Ochre, Raw Umber)
- paper suitable for water-based media (90 lb Hot Press watercolor paper works well)
- drafting tape
Drawing the Scatter Border
First we’ll work out the design on graph paper and then paint a practice berry.
Step 1:
On your graph paper, using a ruler and pencil, draw a 5″ x 7″ block with 1″ borders on the top, left and right sides, and a 1.5″ border at the bottom.
Step 2:
Now that we’ve established the area for our margins, sketch in circles for berries. Draw a few in clumps (use the reference photo for ideas) and a few single berries to fill in the larger empty spaces inside the border.
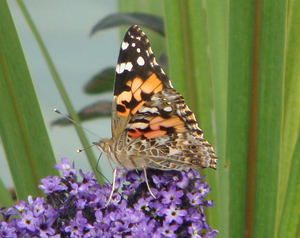
I’ve added a butterfly in the lower corner just to make it a bit more interesting. I found this photo of a Painted Lady butterfly I had taken last summer – one more reason to always keep that camera and sketchbook handy.
Remember, this is a scatter border so don’t be afraid to “scatter” the elements around the page. Sometimes it’s helpful to cut out the various elements from your sketch paper and move them around the layout until you find an arrangement that works best for your design.
Painting the Scatter Border
First we’ll paint in the gold background, paint a practice berry, and then finish the berries on the border.
Step 1:
On your final copy (watercolor) paper, mask the inside area lines of the border with drafting tape. Refer to the post Calligraphy Layout: Designing a Certificate for more information on how to mask areas for painting.
Step 2:
Mix up a bit of Yellow Ochre with a touch of Raw Umber for a yellowish gold color. Use the flat brush to paint the border area.
Wait until the paint is completely dry before removing the drafting tape.
Step 3:
Transfer your layout sketch to the painted border. Refer to the Painting a Simple Initial post for one method of transferring a drawing.
Painting a Simple Berry
Before beginning to paint on the gold background, try painting a few practice berries especially if you are unfamiliar with painting or painting with gouache. Your practice paintings can also be used a reference for the final painting.
On a piece of watercolor paper or sketch paper, draw a circle with a stem.
Step 2:
Mix a bit of Yellow Ochre with Cadmium Red to make an orange color, and using the medium round brush, paint in the berry.
Step 3:
Clean the brush, then use Cadmium Red (not mixed) to paint around the berry as shown. Clean the brush again, then use a little clean water to dampen the brush (don’t soak it) to soften the edges of the red into the orange. You can also use the small brush with a bit of red to draw tiny lines to fade into the orange.
Step 4:
Mix a little Cadmium and White to make a pink color, and paint this in between the red and orange. Use clean water (or tiny brush strokes) to blend the pink into the orange and red areas.
Step 5:
Let the berry dry and little, then use Opaque White to add a little highlight. Use clean water to blend the edges of the highlight.
Mix a bit of Yellow Ochre with Ultramarine Blue to make a light green color, and paint a line for the stem. Add more Ultramarine Blue to make a darker green, and paint this on the side of the light green. Use clean water to soften the edges light and dark green.
Step 6:
Mix a little Raw Umber and paint a bit of a shadow under the berry. Use clean water to soften the edges and blend into the paper. If it looks too dark, add a little white.
Optional: Not all berries ripen at the same time, so some might have a little green. It might be difficult to see in the photo (which is why observing the “real” plant is always best) but a few berries with a little green will be more convincing than just all red berries.
Once you have painted a few practice berries, paint the berries and stems on your border.
We could keep adding a few more elements such as a flowers, leaves, insects, etc. If we were adding calligraphy, remember to do the calligraphy first before painting the border.
It is much easier to correct a painting than to correct calligraphy!


